14.1 강좌 목록 구현
- 지금까지는 회사의 입장에서 서버에 데이터를 저장하는 것과 같은 애플리케이션을 만들었다면 앞으로는 회원의 입장에서 사용할 인터페이스를 만들어보자.
Ex) 메인 페이지에서 강좌 목록으로 이동할 수 있도록 구현
- CourseController
<hide/>
@GetMapping("/course")
public String course(Model model, CourseParam parameter){
    List<CourseDto> list = courseService.frontList(parameter);
    model.addAttribute("list", list);
    return "course/index";
}
- 인덱스 페이지 구성
<hide/>
<!doctype html>
<html lang="ko"  xmlns:th="http://www.thymeleaf.org">
    <head>
        <meta charset="UTF-8">
        <title>강좌 정보 페이지</title>
    </head>
    <body>
        <h1>강좌 정보 페이지</h1>
<!--        <div th:replace="/fragments/layout.html :: fragment-body-menu"></div>-->
        <div th:text="${list}">
        </div>
    </body>
</html>
- 인터페이스에 frontList() 메서드 만든다. 프론트에 필요한 리스트만 나오도록 새로 메서드를 만든다.기존의 list()와 다름
<hide/>
/**
 * 프론트 강좌 목록
 */
List<CourseDto> frontList(CourseParam courseParam);
- CourseDto클래스 일부
-> publice static List<CourseDto> of(Course) 메서드는 Course 객체를 => CourseDto로 형변환 해주는 느낌
-> 두 가지의 of() 메서드 오버로딩
<hide/>
public static CourseDto of(Course course) {
    CourseDto courseDto = CourseDto.builder()
            .id(course.getId())
            .categoryId(course.getCategoryId())
            .imagePath(course.getImagePath())
            .keyword(course.getKeyword())
            .subject(course.getSubject())
            .summary(course.getSummary())
            .contents(course.getContents())
            .price(course.getPrice())
            .salePrice(course.getSalePrice())
            .saleEndDt(course.getSaleEndDt())
            .regDt(course.getRegDt())
            .udtDt(course.getUdtDt())
            .build();
    return courseDto;
}

public static List<CourseDto> of(List<Course> course){
    if(course == null){
        return null;
    }
    List<CourseDto> courseList = new ArrayList<>();
    for(Course x : course){
        courseList.add(CourseDto.of(x));
    }
    return courseList;

}
- Impl 클래스
<hide/>
@Override
public List<CourseDto> frontList(CourseParam courseParam) {
    List<Course> optionalCourseDto = courseRepository.findAll();
    return CourseDto.of(optionalCourseDto);
}
Note) 실행 결과 - 강좌 목록 탭 누른 결과

Ex) 강좌 정보 페이지
- 현재 상태

- 인덱스 페이지
-> 스타일 태그에 line-through 를 넣으면 글에 취소선을 그을 수 있다.
<hide/>
<!doctype html>
<html lang="ko"  xmlns:th="http://www.thymeleaf.org">
    <head>
        <meta charset="UTF-8">
        <title>강좌 정보 페이지</title>
        <style>
        span.price{
            text-decoration: line-through;
        }
        </style>
    </head>
    <body>
        <h1>강좌 정보 페이지</h1>
<!--        <div th:replace="/fragments/layout.html :: fragment-body-menu"></div>-->

        <ul>
            <li th:each="x : ${list}">
                <div>
                    <a th:href="'/course/' +  ${x.id}">
                        <h3 th:text="${x.subject}">강좌명</h3>
                    </a>
                    <div>
                        <p th:text="${x.summary}"></p>
                            판매가: <span class="price"  th:text="${x.price}"></span>
                            할인가: <span th:text="${x.salePrice}"></span>
                        </p>
                    </div>
                </div>
            </li>
        </ul>
    </body>
</html>
Note) 실행 결과 - course 페이지

Ex)
- 특정 카테고리에 대해 몇 개의 정보가 등록됐는지 알 수 있다.
<hide/>
SELECT  c.* , (SELECT COUNT(*)
               FROM course WHERE category_id = c.id) AS course_count
FROM category c;
- 카테고리 매퍼는 멤버매퍼 참고해서 만든다.
- 인터페이스에 추가
<hide/>
/**
 * 프론트 카테고리 정보
 */
List<CategoryDto> frontList(CategoryDto parameter);
- 임플
<hide/>
@Override
public List<CategoryDto> frontList(CategoryDto parameter) {
    return categoryMapper.select(parameter);
}
-> 이제 카테고리 컨트롤에서 카테고리 목록을 가져올 수 있다.
- 컨트롤러
<hide/>
@GetMapping("/course")
public String course(Model model, CourseParam parameter){
    List<CourseDto> list = courseService.frontList(parameter);
    model.addAttribute("list", list);
    List<CategoryDto> categoryList = categoryService.frontList(CategoryDto.builder().build());
    model.addAttribute("categoryList", categoryList);
    return "course/index";
}
Note) 실행 결과

Ex)
- 인덱스 페이지
<hide/>
<!doctype html>
<html lang="ko"  xmlns:th="http://www.thymeleaf.org">
    <head>
        <meta charset="UTF-8">
        <title>강좌 정보 페이지</title>
        <style>
        span.price{
            text-decoration: line-through;
        }
        </style>
    </head>
    <body>
        <h1>강좌 정보 페이지</h1>
<!--        <div th:replace="/fragments/layout.html :: fragment-body-menu"></div>-->
        <div>
            <a href="?">전체</a>
            <th:block th:each="y : ${categoryList}">
                |
                <a th:href="'/course?categoryId=' + ${y.id}"><span th:text="${y.categoryName}">카테고리명</span></a>
            </th:block>
            <hr/>
        </div>
        <ul>
            <li th:each="x : ${list}">
                <div>
                    <a th:href="'/course/' +  ${x.id}">
                        <h3 th:text="${x.subject}">강좌명</h3>
                    </a>
                    <div>
                        <p th:text="${x.summary}"></p>
                            판매가: <span class="price"  th:text="${x.price}"></span>
                            할인가: <span th:text="${x.salePrice}"></span>
                        </p>
                    </div>
                </div>
            </li>
        </ul>
    </body>
</html>
- 컨트롤러
-> @RequestParam(name=" "): 카테고리id 값을 가져올 수 있다.
-> 그 다음, frontList()를 이용해서 전달한다.
<hide/>
@GetMapping("/course")
public String course(Model model,
                     CourseParam parameter){
    List<CourseDto> list = courseService.frontList(parameter);
    model.addAttribute("list", list);
    List<CategoryDto> categoryList = categoryService.frontList(CategoryDto.builder().build());
    model.addAttribute("categoryList", categoryList);
    return "course/index";
}
- 카테고리 서비스 임플
<hide/>
@Override
public List<CategoryDto> frontList(CategoryDto parameter) {
    return categoryMapper.select(parameter);
}
- frontList()
<hide/>
@Override
public List<CourseDto> frontList(CourseParam parameter) {

    if (parameter.getCategoryId() < 1) {
        List<Course> courseList = courseRepository.findAll();
        return CourseDto.of(courseList);
    }

    /** 아래의 반환형을 이렇게 쓸 수도 있다.
     * Optional<List<Course>> OptionalCourses = courseRepository.findByCategoryId(parameter.getCategoryId());
     *         if (OptionalCourses.isPresent()) {
     *             return CourseDto.of(OptionalCourses.get());
     *         }
     *         return null;
     */
    return  courseRepository.findByCategoryId(parameter.getCategoryId()).map(CourseDto::of).orElse(null);
}
- 코스 리포짓
<hide/>
package com.zerobase.fastlms.course.repository;
import com.zerobase.fastlms.course.entity.Course;
import org.springframework.data.jpa.repository.JpaRepository;
import java.util.List;
import java.util.Optional;
public interface CourseRepository extends JpaRepository<Course, Long> {
    Optional<List<Course>> findByCategoryId(long categoryId);
}
Note) 실행 결과 - 프로그래밍 탭 누른 화면

Ex) 강의의 전체 개수 표시
- 인덱스
<hide/>
<a href="?">
    전체 (<span th:text="${courseTotalCount}">0</span>)
</a>
- 컨트롤러
<hide/>
@GetMapping("/course")
public String course(Model model,
                     CourseParam parameter){

    List<CourseDto> list = courseService.frontList(parameter);
    model.addAttribute("list", list);
    List<CategoryDto> categoryList = categoryService.frontList(CategoryDto.builder().build());

    int courseTotalCount = 0;
    if(categoryList != null){

        for(CategoryDto x : categoryList){
            courseTotalCount += x.getCourseCount();
        }
    }
    model.addAttribute("categoryList", categoryList);
    model.addAttribute("courseTotalCount", courseTotalCount);
    return "course/index";
}
Note) 실행 결과

14.2 강좌 상세 정보
Ex)
- 컨트롤러 courseDetail()
<hide/>
@GetMapping("/course/{id}")
public String courseDetail(Model model,
                     CourseParam parameter){
    CourseDto detail = courseService.frontDetail(parameter.getId());
    model.addAttribute("detail", detail);
    return "course/detail";
}
- detail 페이지
<hide/>
<!doctype html>
<html lang="ko"  xmlns:th="http://www.thymeleaf.org">
    <head>
        <meta charset="UTF-8">
        <title>강좌 상세 페이지</title>
        <style>
        span.price{
            text-decoration: line-through;
        }
        </style>
    </head>
    <body>
        <h1>강좌 상세 정보</h1>
        <div th:replace="/fragments/layout.html :: fragment-body-menu"></div>

        <div>
            <h2>강좌명: <span th:text="${detail.subject}">강좌</span></h2>
            <div th:utext="${detail.contents}"></div>
        </div>
        <div>
            <p>가격: <span th:text="${detail.price}">0</span> </p>
            <p>할인 가격: <span th:text="${detail.salePrice}">0</span> </p>
        </div>
        <div>
            <button type="button">수강신청</button>
            <a href="/course">강좌 목록</a>
        </div>
    </body>
</html>
- frontDetail()
<hide/>
/**
 * 프론트에서 강좌 상세 정보를 보여준다.
 * @param id
 * @return
 */
CourseDto frontDetail(long id);
<hide/>
@Override
public CourseDto frontDetail(long id) {
Optional<Course> optionalCourse = courseRepository.findById(id);
if(optionalCourse.isPresent()){
return CourseDto.of(optionalCourse.get());
}
return null;
}
- ThymeLeaf의 th:text

- ThymeLeaf의 th:utext
-> 스마트에디터에서 편집한대로 그대로 나온다.

Note) 실행 결과

14.3 강좌 신청 (1)
Ex) 수강 신청
- TakeCourse클래스
<hide/>
package com.zerobase.fastlms.course.entity;
import lombok.AllArgsConstructor;
import lombok.Builder;
import lombok.Data;
import lombok.NoArgsConstructor;
import javax.persistence.*;
import java.time.LocalDate;
import java.time.LocalDateTime;
@Data
@Entity
@Builder
@NoArgsConstructor
@AllArgsConstructor
public class TakeCourse {

    @Id
    @GeneratedValue(strategy = GenerationType.IDENTITY)
    Long id;

    long courseId;
    String userId;

    long payPrice;  // 결제 금액
    String status;  // 상태 (수강 신청, 결제 완료, 수강 신청)

    LocalDateTime regDt;    // 등록일 - 추가 날짜
}
- TakeCourseRepository
<hide/>
package com.zerobase.fastlms.course.repository;
import com.zerobase.fastlms.course.entity.TakeCourse;
import org.springframework.data.jpa.repository.JpaRepository;
public interface TakeCourseRepository extends JpaRepository<TakeCourse, Long> {
}
-> 실행하면 자동으로 테이블이 세팅된다.
- Ajax 라이브러리를 가져온다. https://github.com/axios/axios
GitHub - axios/axios: Promise based HTTP client for the browser and node.js
Promise based HTTP client for the browser and node.js - GitHub - axios/axios: Promise based HTTP client for the browser and node.js
github.com

<script src="https://cdn.jsdelivr.net/npm/axios/dist/axios.min.js"></script>
- 디테일 자바스크립트
-> axios.post를 이용해서 데아터를 던진다.
-> axios.post().then() ..... StringBuilder에서 메서드 붙여서 추가하는 것과 비슷하다.
<hide/>
<!doctype html>
<html lang="ko"  xmlns:th="http://www.thymeleaf.org">
    <head>
        <meta charset="UTF-8">
        <title>강좌 상세 페이지</title>
        <style>
        </style>
        <script src="https://cdn.jsdelivr.net/npm/axios/dist/axios.min.js"></script>
        <script src="https://code.jquery.com/jquery-3.6.0.min.js" integrity="sha256-/xUj+3OJU5yExlq6GSYGSHk7tPXikynS7ogEvDej/m4=" crossorigin="anonymous"></script>
        <script>
            $(function (){
                $('#submitForm').on('submit', function (){


                    var $thisForm = $(this);
                    var url = '/api/course/req.api';
                    var parameter = {
                        id: $thisForm.find('input[name=id]').val()
                    };

                    axios.post(url, parameter).then(function (response){
                        console.log(response);
                    }).catch(function (err){
                        console.log(err);
                    });
                    return false;
                });
            });
        </script>
    </head>
    <body>
        <h1>강좌 상세 정보</h1>
<!--        <div th:replace="/fragments/layout.html :: fragment-body-menu"></div>-->

        <div>
            <h2>강좌명: <span th:text="${detail.subject}">강좌</span></h2>
            <div th:utext="${detail.contents}"></div>
        </div>
        <div>
            <p>가격: <span th:text="${detail.price}">0</span> </p>
            <p>할인 가격: <span th:text="${detail.salePrice}">0</span> </p>
        </div>
        <div>
            <form id="submitForm" method="post">
                <input type="hidden" name="id" th:value="${detail.id}">
                <button type="submit">수강신청</button>
                <a href="/course">강좌 목록</a>
            </form>

        </div>
    </body>
</html>
cf) @Controller와 @RestController 차이점
-> @Controller: 뷰 엔진의 형태로 반환
-> @RestController: Json 형태로 반환
- ApiCourseCotroller 클래스
-> RestController를 이용했기 때문에 문자열이 반환된다.
-> @RequestBody를 붙여야만 스프링이 자동으로 매핑해준다.
<hide/>
package com.zerobase.fastlms.course.controller;
import com.zerobase.fastlms.admin.service.CategoryService;
import com.zerobase.fastlms.course.model.TakeCourseInput;
import com.zerobase.fastlms.course.service.CourseService;
import lombok.RequiredArgsConstructor;
import org.springframework.http.ResponseEntity;
import org.springframework.stereotype.Controller;
import org.springframework.ui.Model;
import org.springframework.web.bind.annotation.PostMapping;
import org.springframework.web.bind.annotation.RestController;
@RestController
@RequiredArgsConstructor
public class ApiCourseController extends  BaseController{
    private final CourseService courseService;
    private final CategoryService categoryService;

    @PostMapping("api/course/req.api")
    public ResponseEntity<?> courseReq(Model model,
                                   @RequestBody TakeCourseInput parameter){
        return ResponseEntity.ok().body(parameter);
    }
}
- TakeCourseInput 추가한다.
<hide/>
package com.zerobase.fastlms.course.model;
import com.zerobase.fastlms.admin.model.CommonParam;
import lombok.Data;
@Data
public class TakeCourseInput {
    long courseId;
}
14.4 강좌 신청 (2)
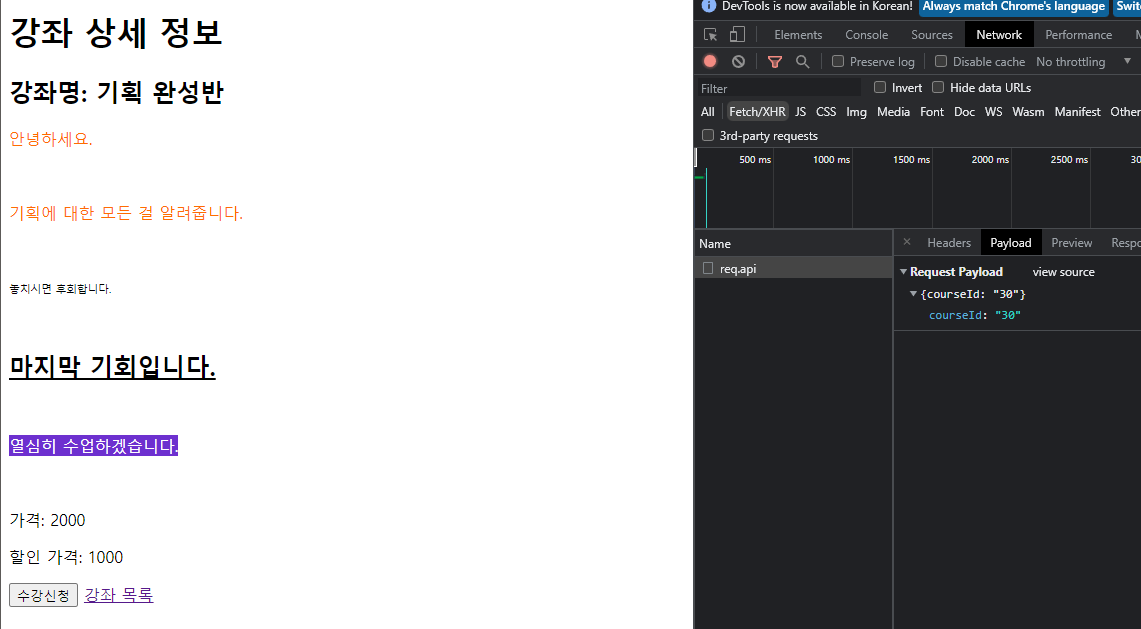
- 수강 신청 누른 실행 결과

Ex)
- 컨트롤러
-> 수강 신청하려면 로그인한 내 아이디도 필요하다.
-> 시큐리티에 있는 Principal 인터페이스를 매개변수로 선언하면 스프링이 로그인 정보를 principal에 주입해준다.
- 테스트 코드
<hide/>
@PostMapping("api/course/req.api")
public ResponseEntity<?> courseReq(Model model,
                                   @RequestBody TakeCourseInput parameter,
                                   Principal principal){
    parameter.setUserId(principal.getName());
    return ResponseEntity.badRequest().body("수강신청에 실패했습니다.");
}
Note) 실행 결과
- bad request(에러 코드: 400) 정상 작동한다. preview, response에도 똑같이 나온다.

- 서비스에 req() 구현 => 수강 신청이 가능하게 만든다.
- 디테일 페이지
<hide/>
<!doctype html>
<html lang="ko"  xmlns:th="http://www.thymeleaf.org">
    <head>
        <meta charset="UTF-8">
        <title>강좌 상세 페이지</title>
        <style>
        </style>
        <script src="https://cdn.jsdelivr.net/npm/axios/dist/axios.min.js"></script>
        <script src="https://code.jquery.com/jquery-3.6.0.min.js" integrity="sha256-/xUj+3OJU5yExlq6GSYGSHk7tPXikynS7ogEvDej/m4=" crossorigin="anonymous"></script>
        <script>
            $(function (){
                $('#submitForm').on('submit', function (){

                    if(!confirm("수강 신청을 하시겠습니까?")){
                        return false;
                    }
                    var $thisForm = $(this);
                    var url = '/api/course/req.api';
                    var parameter = {
                        courseId: $thisForm.find('input[name=id]').val()
                    };

                    axios.post(url, parameter).then(function (response){
                        console.log(response);
                    }).catch(function (err){
                        console.log(err);
                    });
                    return false;
                });
            });
        </script>
    </head>
    <body>
        <h1>강좌 상세 정보</h1>
<!--        <div th:replace="/fragments/layout.html :: fragment-body-menu"></div>-->

        <div>
            <h2>강좌명: <span th:text="${detail.subject}">강좌</span></h2>
            <div th:utext="${detail.contents}"></div>
        </div>
        <div>
            <p>가격: <span th:text="${detail.price}">0</span> </p>
            <p>할인 가격: <span th:text="${detail.salePrice}">0</span> </p>
        </div>
        <div>
            <form id="submitForm" method="post">
                <input type="hidden" name="id" th:value="${detail.id}">
                <button type="submit">수강신청</button>
                <a href="/course">강좌 목록</a>
            </form>

        </div>
    </body>
</html>
Note) 실행 결과


- status code: 200 => 정상 실행된다는 뜻
- TakeCourseCode를 만든다.
<hide/>
package com.zerobase.fastlms.course.entity;
public interface TakeCourseCode {
    String STATUS_REQ = "REQ";  // 수강신청
    String STATUS_COMPLETE = "COMPLETE";  // 결제 완료
    String STATUS_CANCEL = "CANCEL";  // 취소
}
- req()
-> status에 요청값을 넣는다.
<hide/>
@Override
public boolean req(TakeCourseInput parameter) {

    Optional<Course> optionalCourse = courseRepository.findById(parameter.getCourseId());
    if(!optionalCourse.isPresent()){
        return true;
    }

    Course course = optionalCourse.get();
    TakeCourse takeCourse = TakeCourse.builder()
            .courseId(parameter.getCourseId())
            .userId(parameter.getUserId())
            .payPrice(course.getSalePrice())
            .regDt(LocalDateTime.now())
            .status(TakeCourse.STATUS_REQ)
            .build();

    takeCourseRepository.save(takeCourse);
    return true;
}
Ex) 이미 수강 신청한 경우 처리 방법
- userId에 대한 courseId가 이미 있는지 확인한다.
- status가 CANCEL인 경우는 신청 가능해야한다.
- 리포지토리
<hide/>
package com.zerobase.fastlms.course.repository;
import com.zerobase.fastlms.course.entity.TakeCourse;
import org.springframework.data.jpa.repository.JpaRepository;
import java.util.Collection;
public interface TakeCourseRepository extends JpaRepository<TakeCourse, Long> {
    long countByCourseIdAndUserIdAndStatusIn(long courseId, String userId, Collection<String> statusList);
}
- 컨트롤러
-> 배열을 이용해서 수강 신청 완료했는지 요청 중인지 파악하여 count를 이용한다.
<hide/>
@Override
public boolean req(TakeCourseInput parameter) {

    Optional<Course> optionalCourse = courseRepository.findById(parameter.getCourseId());
    if(!optionalCourse.isPresent()){
        return true;
    }

    Course course = optionalCourse.get();

    // 이미 신청 정보가 있는지 확인
    String[] statusList = {TakeCourse.STATUS_REQ, TakeCourse.STATUS_COMPLETE};
    long count = takeCourseRepository.countByCourseIdAndUserIdAndStatusIn(course.getId()
            , parameter.getUserId(), Arrays.asList(statusList));

    if(count > 0){
        return false;
    }

    TakeCourse takeCourse = TakeCourse.builder()
            .courseId(parameter.getCourseId())
            .userId(parameter.getUserId())
            .payPrice(course.getSalePrice())
            .regDt(LocalDateTime.now())
            .status(TakeCourse.STATUS_REQ)
            .build();

    takeCourseRepository.save(takeCourse);
    return true;
}
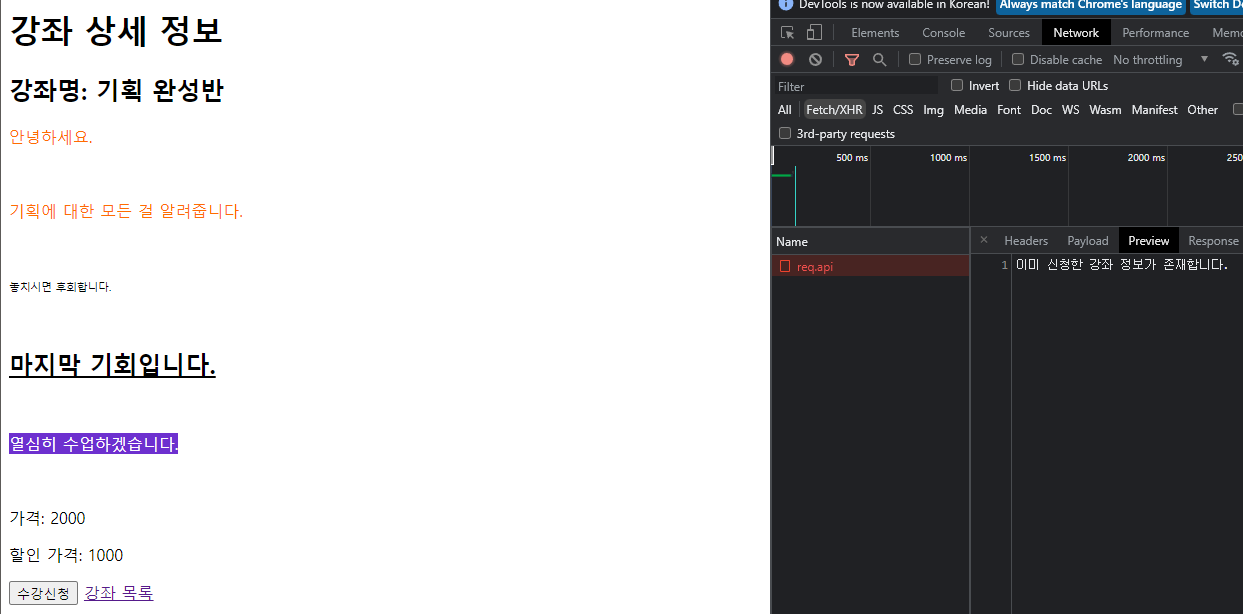
Note) 실행 결과

14.5 강좌 신청 (3)
Ex) 수강신청이 안되는 상황에 따라 알림 보여주는 방법
- 아까와는 다른게 수강 신청의 결과를 boolean이 아닌 문자열 형태로 반환할 것이다.
- req() 다시 작성한다.
<hide/>
@Override
public ServiceResult req(TakeCourseInput parameter) {

    ServiceResult result = new ServiceResult();

    Optional<Course> optionalCourse = courseRepository.findById(parameter.getCourseId());
    if(!optionalCourse.isPresent()){
        result.setResult(false);
        result.setMessage("강좌 정보가 존재하지 않습니다.");   // 실패이유
        return result;
    }

    Course course = optionalCourse.get();

    // 이미 신청 정보가 있는지 확인
    String[] statusList = {TakeCourse.STATUS_REQ, TakeCourse.STATUS_COMPLETE};
    long count = takeCourseRepository.countByCourseIdAndUserIdAndStatusIn(course.getId()
            , parameter.getUserId(), Arrays.asList(statusList));

    if(count > 0){      // 이미 신청헀을 때
        result.setResult(false);
        result.setMessage("이미 신청한 강좌 정보가 존재합니다.");
        return result;
    }

    TakeCourse takeCourse = TakeCourse.builder()
            .courseId(parameter.getCourseId())
            .userId(parameter.getUserId())
            .payPrice(course.getSalePrice())
            .regDt(LocalDateTime.now())
            .status(TakeCourse.STATUS_REQ)
            .build();

    takeCourseRepository.save(takeCourse);
    result.setResult(true);
    result.setMessage("");
    return result;
}
- 컨트롤러도 다시 작성
<hide/>
@PostMapping("api/course/req.api")
public ResponseEntity<?> courseReq(Model model,
                                   @RequestBody TakeCourseInput parameter,
                                   Principal principal){
    parameter.setUserId(principal.getName());
    ServiceResult result = courseService.req(parameter);
    if(!result.isResult()){
        ResponseResult responseResult = new ResponseResult(false, result.getMessage());
        return ResponseEntity.ok().body(responseResult);
    }
    ResponseResult responseResult = new ResponseResult(true);
    return ResponseEntity.ok().body(responseResult); // 성공
}
Note) 실행 결과 - 잘못된 courseId 번호에 대해 수강신청하는 경우

- 값이 있지만 이미 신청한 경우는?

- 자바스크립트
<hide/>
<!doctype html>
<html lang="ko"  xmlns:th="http://www.thymeleaf.org">
    <head>
        <meta charset="UTF-8">
        <title>강좌 상세 페이지</title>
        <style>
        </style>
        <script src="https://cdn.jsdelivr.net/npm/axios/dist/axios.min.js"></script>
        <script src="https://code.jquery.com/jquery-3.6.0.min.js" integrity="sha256-/xUj+3OJU5yExlq6GSYGSHk7tPXikynS7ogEvDej/m4=" crossorigin="anonymous"></script>
        <script>
            $(function (){
                $('#submitForm').on('submit', function (){

                    if(!confirm("수강 신청을 하시겠습니까?")){
                        return false;
                    }
                    var $thisForm = $(this);
                    var url = '/api/course/req.api';
                    var parameter = {
                        courseId: $thisForm.find('input[name=id]').val()
                    };

                    axios.post(url, parameter).then(function (response){
                        console.log(response);
                        console.log(response.data);

                        var msg = response.data || '';

                        if(msg != ''){
                            alert(msg);
                        }

                    }).catch(function (err){
                        console.log(err);
                    });
                    return false;
                });
            });
        </script>
    </head>
    <body>
        <h1>강좌 상세 정보</h1>
<!--        <div th:replace="/fragments/layout.html :: fragment-body-menu"></div>-->

        <div>
            <h2>강좌명: <span th:text="${detail.subject}">강좌</span></h2>
            <div th:utext="${detail.contents}"></div>
        </div>
        <div>
            <p>가격: <span th:text="${detail.price}">0</span> </p>
            <p>할인 가격: <span th:text="${detail.salePrice}">0</span> </p>
        </div>
        <div>
            <form id="submitForm" method="post">
                <input type="hidden" name="id" th:value="${detail.id}">
                <button type="submit">수강신청</button>
                <a href="/course">강좌 목록</a>
            </form>

        </div>
    </body>
</html>
Note) 실행 결과

14.6 강좌 신청 (4)
- 지금까지는 데이터가 서버로 전송될 때, 문자열 형태로 전송이 되고 있다.
- 이 부분을 어떻게 바꿀 수 있을까?
Ex)
- result.json 파일
<hide/>
{
  "header": {
    "result": true,
    "message":  ""
  },

  "body": {
  }
}
- ResponseResult
<hide/>
package com.zerobase.fastlms.common.model;
import lombok.Data;
@Data
public class ResponseResult {
    ResponseResultHeader header;
    Object body;
    public ResponseResult(boolean result, String message) {
        header = new ResponseResultHeader(result, message);
    }

    public ResponseResult(boolean result) {
        header = new ResponseResultHeader(result);
    }
}
- ResponseResultHeader
<hide/>
package com.zerobase.fastlms.common.model;
import lombok.Data;
@Data
public class ResponseResultHeader {
    boolean result;
    String message;
     public ResponseResultHeader(boolean result, String message) {
        this.result = result;
        this.message = message;
    }
    public ResponseResultHeader(boolean result) {
        this.result = result;
    }
}
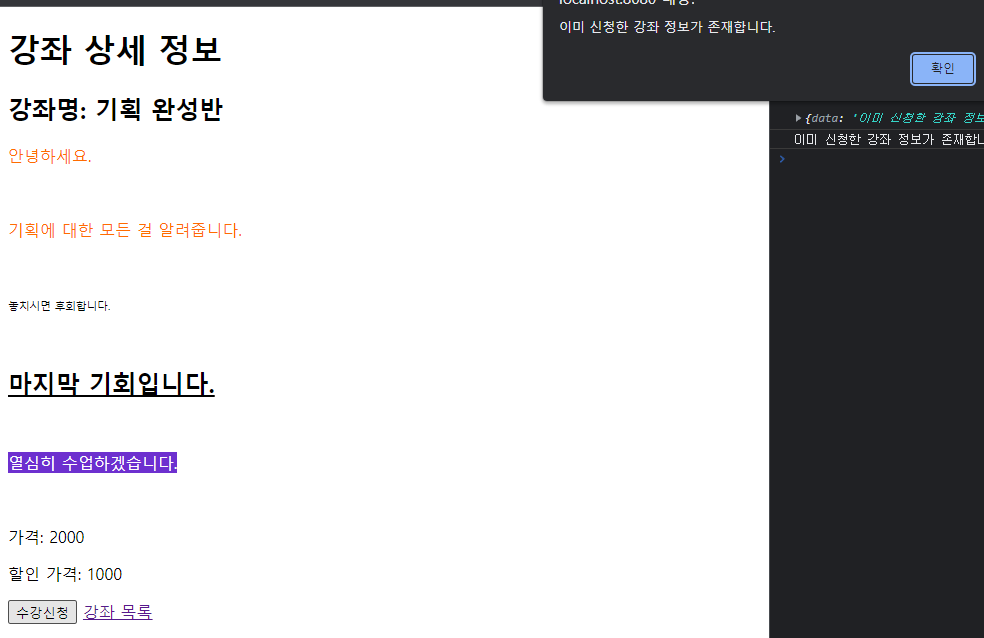
- 컨트롤러에서 데이터를 내릴 때, ResponseResult를 내리도록 한다.
-> 중복하여 수강신청했을 때 콘솔 화면

- detail
<hide/>
<!doctype html>
<html lang="ko"  xmlns:th="http://www.thymeleaf.org">
    <head>
        <meta charset="UTF-8">
        <title>강좌 상세 페이지</title>
        <style>
        </style>
        <script src="https://cdn.jsdelivr.net/npm/axios/dist/axios.min.js"></script>
        <script src="https://code.jquery.com/jquery-3.6.0.min.js" integrity="sha256-/xUj+3OJU5yExlq6GSYGSHk7tPXikynS7ogEvDej/m4=" crossorigin="anonymous"></script>
        <script>
            $(function (){
                $('#submitForm').on('submit', function (){

                    if(!confirm("수강 신청을 하시겠습니까?")){
                        return false;
                    }
                    var $thisForm = $(this);
                    var url = '/api/course/req.api';
                    var parameter = {
                        courseId: $thisForm.find('input[name=id]').val()
                    };

                    axios.post(url, parameter).then(function (response){
                        console.log(response);
                        console.log(response.data);

                        response.data = response.data || {};    // 값이 안 나올 수도 있으니 객체로 초기화
                        response.data.header = response.data.header || {};

                        // 수강 신청 실패
                        if(!response.data.header.result){
                            alert(response.data.header.message);
                            return false;
                        }

                        // 정상
                        alert("강좌가 정상적으로 실행되었습니다.");
                        location.href ='/';

                    }).catch(function (err){
                        console.log(err);
                    });

                    return false;
                });
            });
        </script>
    </head>
    <body>
        <h1>강좌 상세 정보</h1>
<!--        <div th:replace="/fragments/layout.html :: fragment-body-menu"></div>-->

        <div>
            <h2>강좌명: <span th:text="${detail.subject}">강좌</span></h2>
            <div th:utext="${detail.contents}"></div>
        </div>
        <div>
            <p>가격: <span th:text="${detail.price}">0</span> </p>
            <p>할인 가격: <span th:text="${detail.salePrice}">0</span> </p>
        </div>
        <div>
            <form id="submitForm" method="post">
                <input type="hidden" name="id" th:value="${detail.id}">
                <button type="submit">수강신청</button>
                <a href="/course">강좌 목록</a>
            </form>

        </div>
    </body>
</html>
Note) 실행 결과 - 중복으로 신청한 경우

Note) 실행 결과 - 새로운 강좌를 신청한 경우, 아래의 창이 뜨고 난 다음 메인 페이지 이동

'Spring Projcect > 학습 관리 시스템 & 백오피스 구축' 카테고리의 다른 글
| Chapter 16. 회원 정보 수정 (0) | 2022.08.25 |
|---|---|
| Chapter 15. 백 오피스(강좌 신청 처리 구현) (0) | 2022.08.24 |
| Chapter 13. 강좌 목록 (0) | 2022.08.23 |
| Chapter 12. 카테고리 화면 (0) | 2022.08.22 |
| Chapter 11. 회원 상세 및 상태 처리 (0) | 2022.08.21 |