4.1 openweathermap 데이터 확인
API key란 무엇인가?
- Aithentication(인증): API를 호출하는 대상을 확인하는 절차를 API 인증이라고 한다.
- API key 방식
- API Token방식
- API key: 특정 사용자만 알 수 있는 문자열을 말한다.
- API 제공처로부터 key를 발급 받도 API 호출 시에 key를 메시지 안에 넣어서 호출한다.
- openweathermap 서버는 메시지 안에서 key를 읽어서 누가 호출한 API인지 인증한다.
API key를 이용해서 날씨 정보 불러오기
Сurrent weather and forecast - OpenWeatherMap
Access current weather data for any location on Earth including over 200,000 cities! The data is frequently updated based on the global and local weather models, satellites, radars and a vast network of weather stations. how to obtain APIs (subscriptions w
openweathermap.org
- 회원가입하고 계정을 활성화시키면 API key가 이메일로 온다.
- https://openweathermap.org/api 에서 Current Weather Data를 선택한다.
- API Docs: 어떻게 해야 사용할 수 있는지 알려주는 파일과 같다.
- Sample URL
Members
Enter your email address and we will send you a link to reset your password.
home.openweathermap.org
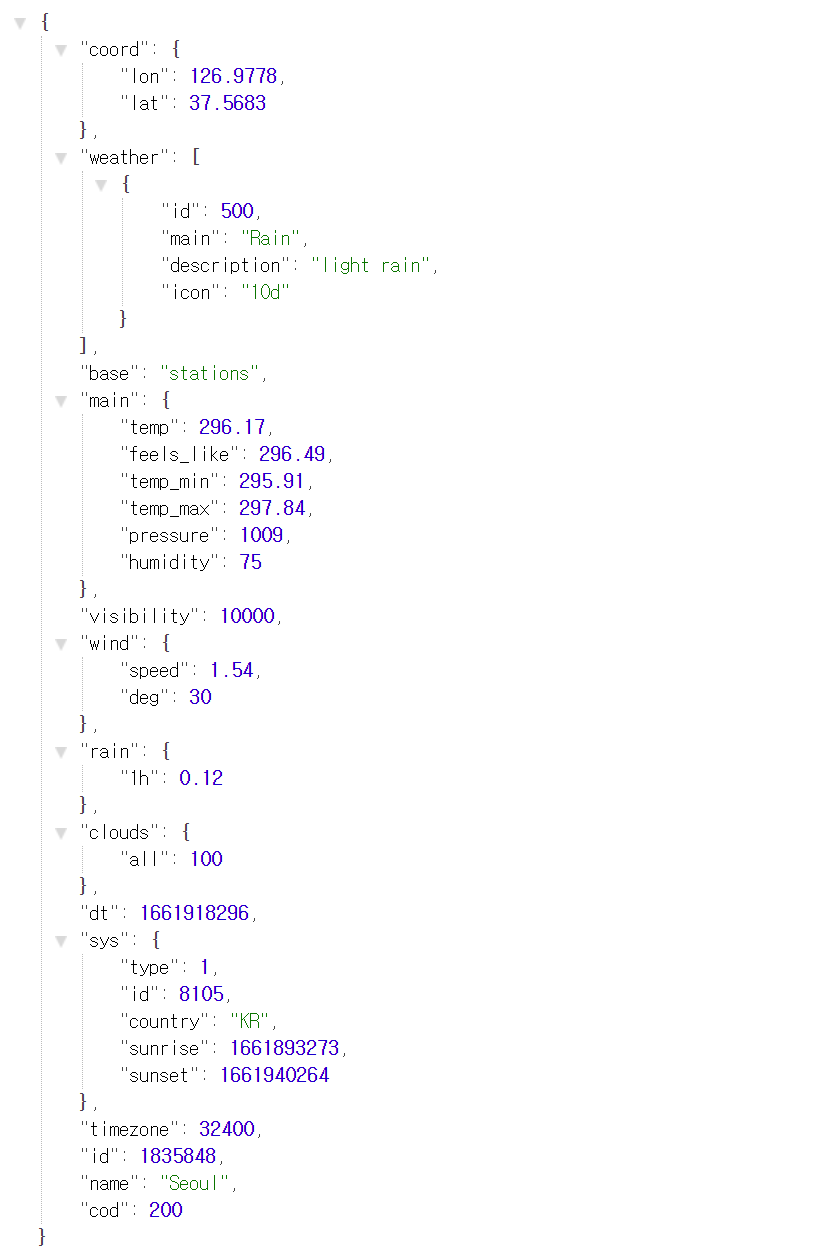
- URL에 API key를 넣어서 들어간 화면 (크롬의 Json Formatter 확장 프로그램을 사용해서 정리된 모습)
4.2 날씨 데이터 저장 API 작성
날씨 일기 저장 API 구현
- 데이터 받아오기
- Json 데이터 파싱하기
- 내 데이터베이스에 저장하기
스프링 MVC 패턴

- 스프링: Controller ~ Repository
- 스프링 MVC(Model View Controller)
- Controller: 클라이언트와 맞닿아 통신한다.
- Service: Controller Repository를 이어준다.
- Repository: 데이터베이스와 맞닿아 통신하는 역할
- Controller
- @GetMapping: 조회 @PostMapping: 저장
- @RequestParam: 요청을 보낼 때 넣어주는 param을 의미한다. (url 뒤에 붙는 값)
- @DateTimeFormat: 요청 받는 데이터의 날짜 형식 지정 가능하다.
- date를 받아서 text를 보낼 것이다.
- properties 파일에 "openweathermap.key={API key}"를 아래와 같이 추가하고 이 값을 컨트롤러에서 @Value로 가져와서 사용 가능하다.
- 왜 @Value를 이용할까?
- 실무 개발에서는 로컬, 원격, dev 환경에 따라 각각 데이터베이스를 따로 지정한다.
- 따라서, 환경 분리에 대한 내용을 properties에 지정해줘야 한다. 코드 상에서는 환경과 무관하게 value를 가져오도록 하기 위해 환경에 따라 다른 값들을 properties 저장하고 꺼내쓴다.
- @RestController
- 지금 컨트롤러에서 서비스의 createDiary()를 호출한다.
- @RestController는 기본 @Controller에 기능이 추가된 어노테이션이다. (@RestControllers가 상태 코드 (ex. 200, 404, 500, ...)를 알려준다.)
openweathermap.key= "api key"<hide/>
package zerobase.weather.controller;
import org.springframework.format.annotation.DateTimeFormat;
import org.springframework.web.bind.annotation.PostMapping;
import org.springframework.web.bind.annotation.RequestBody;
import org.springframework.web.bind.annotation.RequestParam;
import org.springframework.web.bind.annotation.RestController;
import zerobase.weather.service.DiaryService;
import java.time.LocalDate;
@RestController
public class DiaryController {
private final DiaryService diaryService;
public DiaryController(DiaryService diaryService) {
this.diaryService = diaryService;
}
@PostMapping("/create/diary")
void createDiary(@RequestParam @DateTimeFormat(iso = DateTimeFormat.ISO.DATE) LocalDate date, @RequestBody String text){
diaryService.createDiary(date, text);
}
}
- Service
<hide/>
package zerobase.weather.service;
import org.springframework.beans.factory.annotation.Value;
import org.springframework.stereotype.Service;
import java.time.LocalDate;
@Service
public class DiaryService {

    @Value("${openweathermap.key}")
    private String apiKey;

    public void createDiary(LocalDate date, String text){
        getWeatherString();
    }

    private String getWeatherString(){
        String apiUrl = "https://api.openweathermap.org/data/2.5/weather?q=seoul&appid=" + apiKey;
        System.out.println(apiUrl);
        return  "";
    }
}
- Repository - JpaRepo를 extend할 예정
<hide/>
package zerobase.weather.repository;
import org.springframework.stereotype.Repository;
@Repository
class DiaryRepository {
}
- postman - API test 프로그램
- 사이트에서 회원가입 후, 설치 https://www.postman.com/downloads/
- postman을 쓰는 이유는?
- 지금은 로컬로 요청을 보내지만 실무에는 실제 운영망에 요청을 보내서 로컬에 요청을 보낼 때와의 차이를 확인하고 싶은 경우도 있기 때문이다. dev/ local / real 환경 마다 주소가 다르다.


Note) 실행 결과 - send를 누른 화면

Json Parsing(파싱)
Ex 1) 날씨 데이터를 받아와서 출력하기
- buile.gradle에 dependency를 추가한다.
implementation 'com.googlecode.json-simple:json-simple:1.1.1'
- Service
- openweathermap.key에 대한 값은 properties에서 가져온다.
<hide/>
package zerobase.weather.service;
import org.springframework.beans.factory.annotation.Value;
import org.springframework.stereotype.Service;
import java.io.BufferedReader;
import java.io.InputStreamReader;
import java.net.HttpURLConnection;
import java.net.URL;
import java.time.LocalDate;
@Service
public class DiaryService {

    @Value("${openweathermap.key}")
    private String apiKey;

    public void createDiary(LocalDate date, String text){
        System.out.println(getWeatherString());
    }

    private String getWeatherString(){
        String apiUrl = "https://api.openweathermap.org/data/2.5/weather?q=seoul&appid=" + apiKey;

        try {
            URL url = new URL(apiUrl);
            HttpURLConnection connection = (HttpURLConnection) url.openConnection();  //  apiUrl을 HttpURL 형식으로 연결
            connection.setRequestMethod("GET"); // get 요청
            int responseCode = connection.getResponseCode();   // 요청을 보낸 다음에 받아온 응답 결과를 응답 코드(상태 코드)로 받아올 수 있다.

            BufferedReader br;
            if(responseCode == 200){    // 정상
                br = new BufferedReader(new InputStreamReader(connection.getInputStream()));
            }else{
                br = new BufferedReader(new InputStreamReader(connection.getErrorStream()));
            }

            String inputLine;
            StringBuilder response = new StringBuilder();   // 결괏값을 response에 쌓는다.

            while((inputLine = br.readLine()) != null){
                response.append(inputLine);
            }
            br.close();
            return response.toString();
        } catch (Exception e) {
            return "failed to get response!";
        }
    }
}
- 그 다음 postman에서 호출한다.

Note) 실행 결과 - 스프링 부트
- weatherString 가져오기 성공
<hide/>
{"coord":{"lon":126,"lat":37},"weather":[{"id":803,"main":"Clouds","description":"broken clouds","icon":"04d"}],"base":"stations","main":{"temp":296.63,"feels_like":297.07,"temp_min":295.93,"temp_max":297.84,"pressure":1008,"humidity":78},"visibility":10000,"wind":{"speed":2.06,"deg":330},"clouds":{"all":75},"dt":1661927432,"sys":{"type":1,"id":8105,"country":"KR","sunrise":1661893273,"sunset":1661940264},"timezone":32400,"id":1835848,"name":"Seoul","cod":200}
Ex 2) 받아온 날씨 데이터 Json Parsing
- Service 클래스에 parseWeather()
- jsonObject.get("weather"): weather의 value를 가져온다.
<hide/>
// temp(온도), main, icon을 Map형태로 반환해준다.
private Map<String, Object> parseWeather(String jsonString){

    JSONParser jsonParser = new JSONParser();
    JSONObject jsonObject;  // parsing 결괏값

    try{
        jsonObject = (JSONObject) jsonParser.parse(jsonString);     // 파싱 결과
    }catch (ParseException e){
        throw new RuntimeException(e);
    }

    Map<String, Object> resultMap = new HashMap<>();
    JSONObject mainData = (JSONObject) jsonObject.get("main");          // main의 value
    resultMap.put("temp", mainData.get("temp"));
    JSONObject weatherData = (JSONObject) jsonObject.get("weather");   //
    resultMap.put("main", mainData.get("main"));
    resultMap.put("icon", mainData.get("icon"));
    return resultMap;
}
Ex 3) 내 데이터베이스에 저장하기
- project 데이터베이스에 diary 테이블을 만든다.
<hide/>
create table diary(
                      id INT not null primary key auto_increment,
                      weather VARCHAR(50) NOT NULL,
                      icon VARCHAR(50) NOT NULL,
                      temperature DOUBLE NOT NULL,
                      text VARCHAR(500) NOT NULL,
                      date DATE NOT NULL
);
- Diary 엔티티 만들기
- @Id: 데이터베이스 테이블의 Primary key(기본 키)와 객체의 필드를 매핑하는 어노테이션
- @Id만 사용하는 경우 기본 키를 직접 할당해줘야 한다.
- 기본키를 직접 할당하지 않고 데이터베이스가 직접 할당하는 값을 사용하기 위해 @GeneratedValue사용
- @GeneratedValue(strategy="생성 전략"): 기본 키를 자동 생성하는 어노테이션
- @GeneratedValue(strategy=GenerationType.IDENTITY): 기본 키 생성을 데이터베이스에 위임한다.
<hide/>
package zerobase.weather.domain;
import lombok.Data;
import lombok.NoArgsConstructor;
import javax.persistence.Entity;
import javax.persistence.GeneratedValue;
import javax.persistence.GenerationType;
import javax.persistence.Id;
import java.time.LocalDate;

@Entity
@Data
@NoArgsConstructor
public class Diary {
    @Id
    @GeneratedValue(strategy = GenerationType.IDENTITY)
    private int id;
    private String weather;
    private String icon;
    private double temperature;
    private String text;
    private LocalDate date;
}
- Service에 createDiary()
<hide/>
public void createDiary(LocalDate date, String text){

    // 날씨 데이터 가져오기
    String weatherData = getWeatherString();

    // 받아온 날씨 json 파싱
    Map<String, Object> parsedWeather = parseWeather(weatherData);

    // 파싱된 데이터와 일기 값을 내 데이터베이스에 넣기
    Diary nowDiary = new Diary();
    nowDiary.setWeather(parsedWeather.get("main").toString());
    nowDiary.setIcon(parsedWeather.get("icon").toString());
    nowDiary.setTemperature((Double) parsedWeather.get("temp"));
    nowDiary.setText(text);
    nowDiary.setDate(date);
    diaryRepository.save(nowDiary); // DB에 데이터 넣는다.
}
- Repository
<hide/>
package zerobase.weather.repository;
import org.springframework.data.jpa.repository.JpaRepository;
import org.springframework.stereotype.Repository;
import zerobase.weather.domain.Diary;
@Repository
interface DiaryRepository extends JpaRepository<Diary, Integer> {

}
- parseWeather()를 수정한다. weather의 값은 배열로 이뤄져있기 때문이다.
- 그런데, 대괄호 안에 리스트 안에 객체가 딱 하나 있기 때문에 get(0)으로 가져오면 된다.
<hide/>
// temp(온도), main, icon을 Map형태로 반환해준다.
private Map<String, Object> parseWeather(String jsonString){

    JSONParser jsonParser = new JSONParser();
    JSONObject jsonObject;  // parsing 결괏값

    try{
        jsonObject = (JSONObject) jsonParser.parse(jsonString);     // 파싱 결과
    }catch (ParseException e){
        throw new RuntimeException(e);
    }

    Map<String, Object> resultMap = new HashMap<>();
    JSONObject mainData = (JSONObject) jsonObject.get("main");          // main의 value
    resultMap.put("temp", mainData.get("temp"));
    JSONArray weatherArray = (JSONArray) jsonObject.get("weather");   //
    JSONObject weatherData = (JSONObject) weatherArray.get(0);   //
    resultMap.put("main", weatherData.get("main"));
    resultMap.put("icon", weatherData.get("icon"));
    return resultMap;
}
Note) 실행 결과 - send 누른 결과
- sql워크 벤치에서도 확인 가능하다.

출처 - 제로베이스 백엔드 스쿨 김조현 강사님
제로베이스 - 누구나 취업하는 가장 합리적인 취업 스쿨
코딩 부트 캠프 개발자, 데이터 사이언티스트, 마케터, PM, 디자이너 등 제대로 공부하고 확실하게 취업하세요. 당신의 삶의 전환점이 될 제로베이스 스쿨입니다.
zero-base.co.kr
'Spring Projcect > 날씨 일기 프로젝트' 카테고리의 다른 글
| Chapter 06. Spring Transaction(스프링 트랜잭션) (0) | 2022.08.31 |
|---|---|
| Chapter 05. 날씨 데이터 CRUD (0) | 2022.08.31 |
| Chapter 03. DB에 작업하기 (0) | 2022.08.30 |
| Chapter 02. 프로젝트 준비하기 (0) | 2022.08.30 |
| Chapter 01. 프로젝트 진행 전 준비 사항 (2) | 2022.08.30 |