메타 애너테이션
- 메타 애너테이션이란?
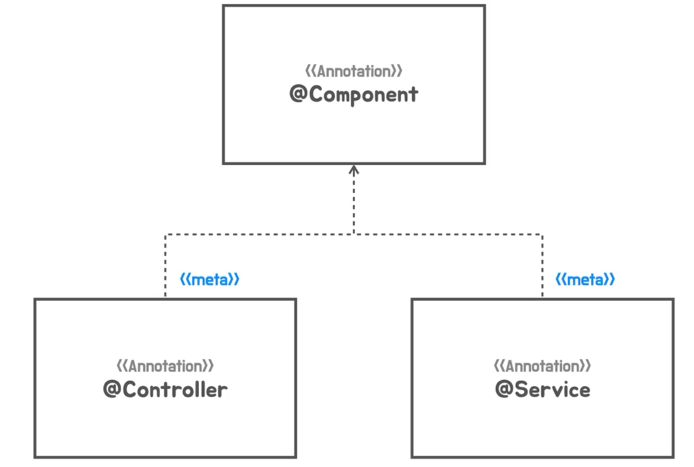
- 메타 애너테이션: 애너테이션을 위한 애너테이션을 말한다. ex) @Component
- @Service, @Controller 를 타고 들어가면 상위에 @Component가 붙어있는 걸 알 수 있다.
- 메타 애너테이션이 불은 클래스를 사용하면 기능적으로는 차이가 없다.
- 그런데, @Service / @Controller와 같이 다른 이름을 붙이는 것은 WebMvc 에서 컨트롤러 / 서비스 어느 역할인지를 명확히 할 수 있다.
- 메타 애너테이션에는 상속 개념이 없다.
- 에너테이션에는 @Retention(RetentionPolicy.RUNTIME), @Target 을 줘야한다.
- @Retention(RetentionPolicy)의 디폴트 값은 RetentionPolicy.CLASS 인데 이는 애너테이션 정보가 컴파일된 클래스 파일까지만 정보가 살아있도록 설정해준다. 즉, 해당 애너테이션이 달린 다른 클래스를 로딩할 때는 정보가 사라진다는 뜻이다. 따라서 RUNTIME을 주도록 한다.
- 이 때, 메타 애너테이션의 @Target 안에 있는 ElementType 속성이 일치해야한다.
- 애너테이션 만들기
<hide/>
@Retention(RetentionPolicy.RUNTIME)
@Target(ElementType.METHOD)
@Test
@interface UnitTest {
}

class SimpleHelloServiceTest {
    @UnitTest
    void sayHello() {
        SimpleHelloService helloService = new SimpleHelloService();
        String ret = helloService.sayHello("Test");
        assertThat(ret).isEqualTo("Hello! Test");
    }
    @UnitTest
    void helloDecorator() {
        HelloDecorator decorator = new HelloDecorator(name -> name);
        String ret = decorator.sayHello("Test");
        Assertions.assertThat(ret).isEqualTo("*Test*");
    }
}
합성 애너테이션의 적용
- 합성 애너테이션
- ex) @RestController = @ResponseBody + @Controller + @Component

Ex)
<hide/>
@Retention(RetentionPolicy.RUNTIME)
@Target(ElementType.TYPE)
@Configuration
@ComponentScan
public @interface MySpringBootAnnotation {
}
- 아래의 두 개의 빈에 대한 정보가 없으면 에러가 난다.
<hide/>
@MySpringBootAnnotation
public class HellobootApplication {

    @Bean
    public ServletWebServerFactory servletWebServerFactory(){
        return new TomcatServletWebServerFactory();
    }

    @Bean
    public DispatcherServlet dispatcherServlet(){
        return new DispatcherServlet();
    }

    public static void main(String[] args) {
        SpringApplication.run(HellobootApplication.class, args);
    }
}
- test
<hide/>
public class HelloApiTest {

    @Test
    void helloApi() {
        TestRestTemplate rest = new TestRestTemplate();
        ResponseEntity<String> response = rest.getForEntity(
            "http://localhost:8080/hello?name={name}", String.class, "Spring");
        assertThat(response.getStatusCode()).isEqualTo(HttpStatus.OK);
        assertThat(response.getHeaders().getFirst(HttpHeaders.CONTENT_TYPE)).startsWith(
            MediaType.TEXT_PLAIN_VALUE);
        assertThat(response.getBody()).isEqualTo("*Hello! Spring*");
    }

    @Test
    void failHelloApi() {
        TestRestTemplate rest = new TestRestTemplate();
        ResponseEntity<String> response = rest.getForEntity(
            "http://localhost:8080/hello?name=", String.class);
        assertThat(response.getStatusCode()).isEqualTo(HttpStatus.INTERNAL_SERVER_ERROR);
    }
}
Note) 실행 결과 - 성공
- 그런데 위에 HellobootApplication 클래스 안에 있는 두 개의 빈이 없는 경우는 문제가 생긴다.
- 따라서, 이에 대한 구성 정보를 다른 클래스에 빼내서 만들 필요가 있다.
- @Component를 붙일 수도 있으나 @Configurtion을 붙이는 게 좋다.
<hide/>
@Configuration
public class Config {
    @Bean
    public ServletWebServerFactory servletWebServerFactory(){
        return new TomcatServletWebServerFactory();
    }
    @Bean
    public DispatcherServlet dispatcherServlet(){
        return new DispatcherServlet();
    }
}
빈 오브젝트와 역할과 구분
- content
- ???: 스프링 부트가 컨테이너리스한 속성을 지원하기 위해서 내장형 서블릿 컨테이너를 이용하는 독립 실행형 애플리케이션 방식으로 동작하도록 "TomcatServletWebServerFactory", "DispatcherServlet" 이 꼭 필요하다.
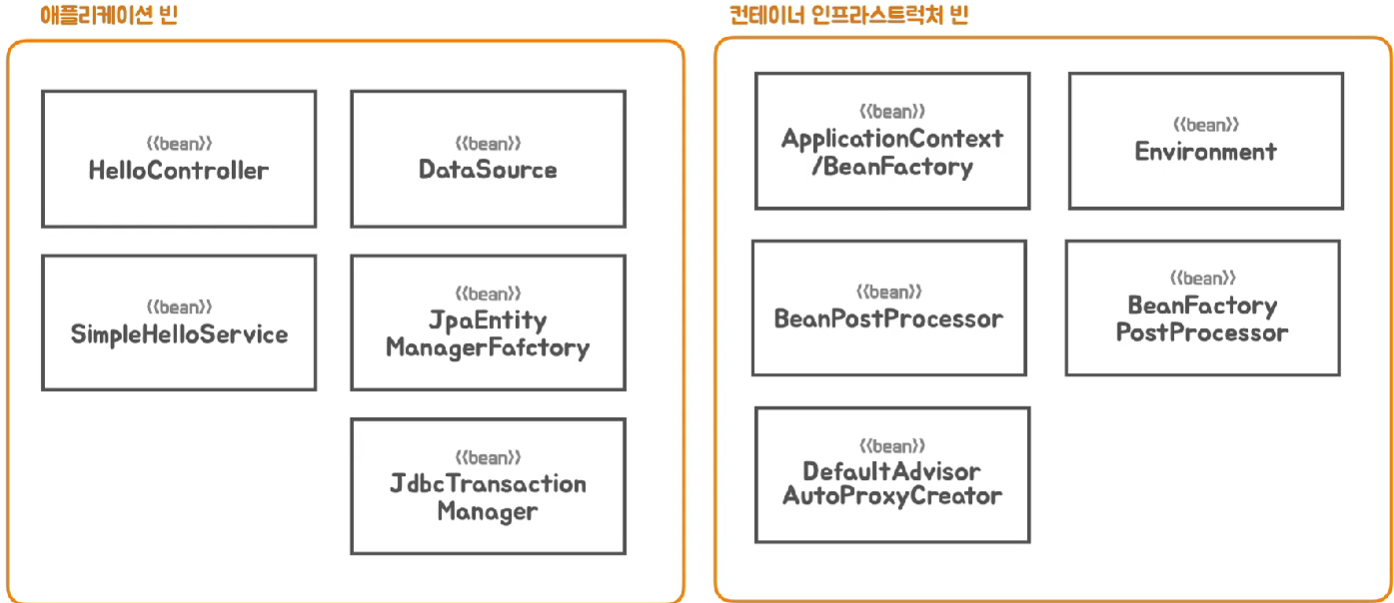
- 1) 애플리케이션 빈: 개발자가 명시적으로 넣는 정보
- 애플리케이션 로직 빈 / 애플리케이션 인프라스트럭처 빈으로 구분한다.
- 애플리케이션 로직 빈: 애플리케이션의 기능, 비즈니스 로직을 담고 있는 빈들, 사용자 구성 정보(ComponentScan)를 담고 있다.
- 애플리케이션 인프라스트럭처 빈: 기술과 관련된 것들로서 개발자가 직접 작성하지는 않는다. 자동 구성 정보(AutoConfiguration)를 담고 있다. ex) TomcatServletWebServerFactory, DispatcherServlet
- 2) 컨테이너 인프라스트럭처 빈: 스프링 컨테이너 자신이거나 컨테이너가 기능을 확장하면서 추가해온 것들을 빈으로 등록
인프라 반 구성 정보의 분리
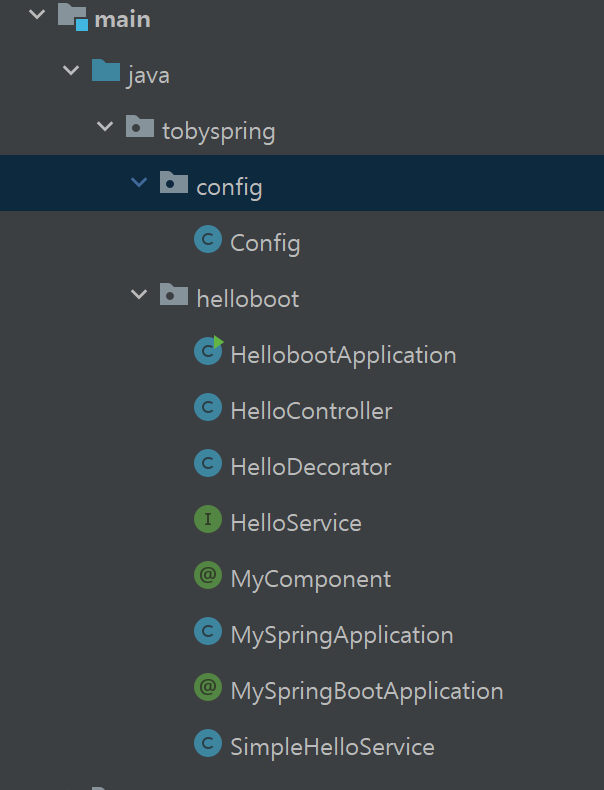
- 기존에 만들었던 구성 정보를 담고 있는 Config 라는 클래스는 사용자 구성 정보에 담지 말아야한다.
- 컴포넌트 스캔 대상에서 제외시켜야한다.
- 제외시키기 위해 다음과 같이 새로운 폴더를 만들어서 config 클래스를 이동한다.
- 이 상태로 애플리케이션을 돌리면?
Note) 실행 결과
- 다음과 같이 서버가 뜨지 않는다
- 기본적으로 같은 패키지 안에 있는 정보들만
- 스캐너는 config 클래스 안에 있는 두 개의 팩토리 빈을 실행할 수 없다.
***************************
APPLICATION FAILED TO START
***************************

Description:

Web application could not be started as there was no org.springframework.boot.web.servlet.server.ServletWebServerFactory bean defined in the context.

Action:

Check your application's dependencies for a supported servlet web server.
Check the configured web application type.
- 해결
- 따라서, Config를 컴포넌트 스캔 대상은 아니더라도 구성 정보에는 포함이 되도록 만들어야한다.
- @Import를 MySpringBootApplication 인터페이스 위에 붙이고 안에 Config.class 를 넣어준다.
- 클래스 이름을 추가하면 구성 정보를 추가할 수 있다.
- 다음과 같이 클래스를 나눈다.
- 기존의 config 클래스를 다음과 같이 두 개의 클래스로 분리했다.
- 해당 클래스들은 나중에 자동 구성의 대상으로 삼을 것이다.
@Configuration
public class TomcatWevServerConfig {
    @Bean
    public ServletWebServerFactory servletWebServerFactory() {
        return new TomcatServletWebServerFactory();
    }
}
@Configuration
public class DispatcherServletConfig {
    @Bean
    public DispatcherServlet dispatcherServlet() {
        return new DispatcherServlet();
    }
}
- 그런데 여기서 문제는?
- 구성 정보가 늘어날 때마다 import() 안에 데이터가 추가될 것이다.
- 최상위 레벨의 애너테이션에 어떤 정보가 나열되는 것은 바람직하지 않다.
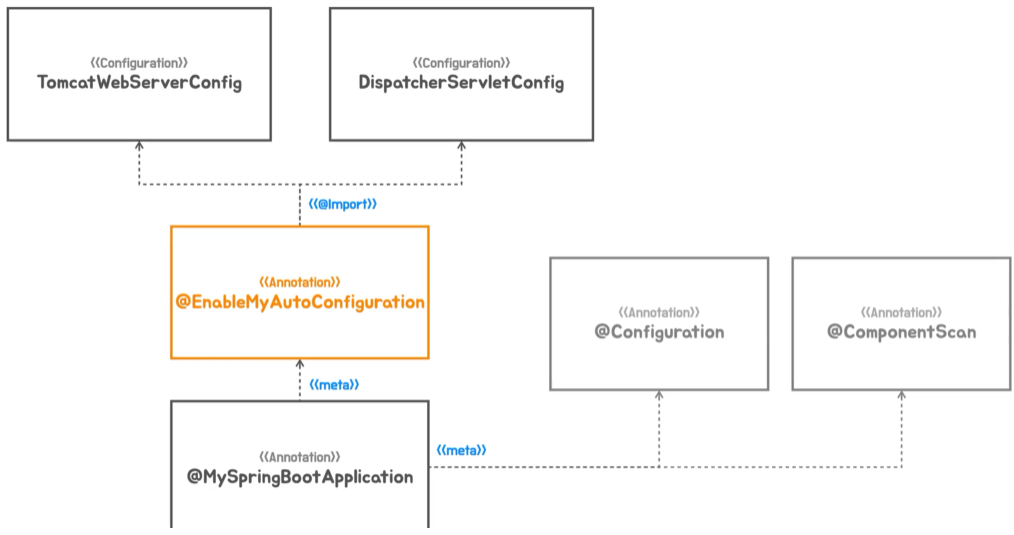
- 따라서 새로운 애너테이션을 만들고 이 애너테이션을 MySpringBootApplication에 붙인다.
@Retention(RetentionPolicy.RUNTIME)
@Target(ElementType.TYPE)
@Import({TomcatWebServerConfig.class, DispatcherServletConfig.class})
public @interface EnableMyAutoConfiguration {

}
@Retention(RetentionPolicy.RUNTIME)
@Target(ElementType.TYPE)
@Configuration
@ComponentScan
@EnableMyAutoConfiguration
public @interface MySpringBootApplication {
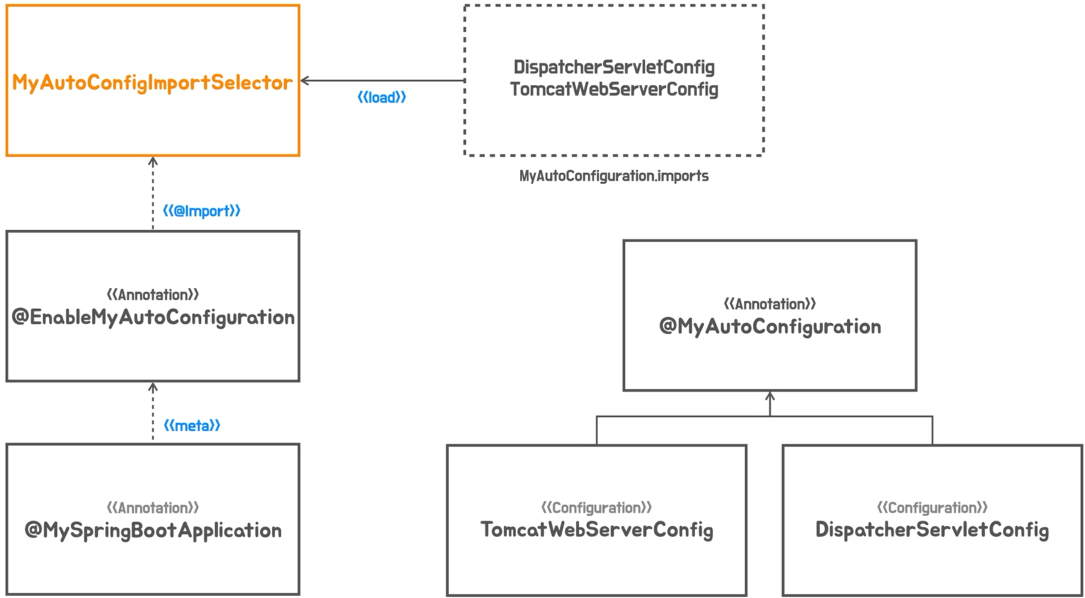
}동적인 자동 구성 정보 등록(AutoConfiguration)
- 구성 정보들을 동적으로 추가하려면 어떻게 해야할까?
- ImportSelector 인터페이스를 이용한다.
- selectImport() 메서드를 하나 가지고 있다.
- 아래 메서드의 반환값 안에 import 할 configuration 클래스의 이름을 string으로 만들어준다.
- 그럼 컨테이너가 해당 클래스들을 구성 정보로 사용한다.
- 새로운 셀렉터 클래스를 만든다.
<hide/>
public class MyAutoConfigImportSelector implements DeferredImportSelector {

    @Override
    public String[] selectImports(AnnotationMetadata importingClassMetadata) {
        return new String[]{
            "tobyspring.config.autoconfig.DispatcherServletConfig",
            "tobyspring.config.autoconfig.TomcatWebServerConfig",
        };
    }
}
- 기존에 만들었던 애너테이션에서 import 안에 값을 다음과 같이 바꾼다.
- Import를 통해 위에서 넣은 config 클래스 두 개를 가져와서 서버가 정상적으로 뜬다.
<hide/>
@Retention(RetentionPolicy.RUNTIME)
@Target(ElementType.TYPE)
@Import({MyAutoConfigImportSelector.class})
public @interface EnableMyAutoConfiguration {

}
자동 구성 정보 파일 분리
- MyAutoConfig 라는 클래스를 만든다.
- 메타 애너테이션으로 @Config 를 붙인다.
@Retention(RetentionPolicy.RUNTIME)
@Target(ElementType.TYPE)
@Configuration
public @interface MyAutoConfiguration {
}
- Selector 클래스
- setBeanClassLoader():
- 아래와 같이 넣으면 candidates 에는 자동 구성에 사용할 설정 정보에 대한 목록이 들어간다.
- autoConfigs.toArray(new String[0]);
- = Arrays.copyOf(autoConfigs.toArray(), autoConfigs.size(), String[].class);
- load()안에 있는 값들을 모두 읽어와서 String으로 바꿔서 반환한다.
Arrays.copyOf(autoConfigs.toArray(), autoConfigs.size(), String[].class);
- 다음과 같이
- List => Array 로 바꿀 수 있다. Java 8부터 가능
autoConfigs.toArray(new String[0]);
tobyspring.config.autoconfig.TomcatWebServerConfig
tobyspring.config.autoconfig.DispatcherServletConfig
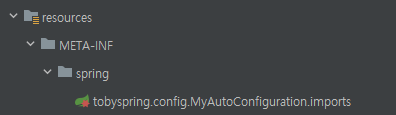
@Retention(RetentionPolicy.RUNTIME)
@Target(ElementType.TYPE)
@Configuration
public @interface MyAutoConfiguration {

}


<hide/>
2023-07-19 23:58:01.097 ERROR 24660 --- [           main] o.s.b.d.LoggingFailureAnalysisReporter   :

***************************
APPLICATION FAILED TO START
***************************

Description:

Web application could not be started as there was no org.springframework.boot.web.servlet.server.ServletWebServerFactory bean defined in the context.

Action:

Check your application's dependencies for a supported servlet web server.
Check the configured web application type.
@Override
public String[] selectImports(AnnotationMetadata importingClassMetadata) {
/** 오류
    List<String> autoConfigs = new ArrayList<>();
    ImportCandidates.load(MyAutoConfiguration.class, classLoader).forEach(
    autoConfigs::add);
    return autoConfigs.toArray(new String[0]);
*/
    return new String[]{
        "tobyspring.config.autoconfig.TomcatWebServerConfig",
        "tobyspring.config.autoconfig.DispatcherServletConfig"};
}- 오류: ServletWebServerFactory 빈이 존재하지 않아서 서버를 시작할 수 없다.
- 위의 코드에서 아래와 같이 "Tomcat", "Dispatcher.." 에 대한 파일명을 직접 넣으면 서버가 정상 구동되지만 위의 autoConfigs.코드를 이용하면 서버가 구동되지 않는다.
- 원인
- ??
- 해결
자동 구성 애너테이션 적용
- MyAutoConfigs
- 다음과 같이 proxyBeanMethods 속성을 false로 변경한다.
- 메타 애너테이션이 MyAutoConfigs 의 하위에 있는 애너테이션들이 프록시로 만들어지지 않고 사용되므로 false 설정한다.
<hide/>
@Retention(RetentionPolicy.RUNTIME)
@Target(ElementType.TYPE)
@Configuration(proxyBeanMethods = false)
public @interface MyAutoConfiguration {

}
@Configuration과 proxyBeanMethods
- 테스트 클래스를 만든다.
<hide/>
public class ConfigurationTest {

    @Configuration
    static class MyConfig {

        @Bean
        Common common(){
            return new Common();
        }
        @Bean
        Bean1 bean1(){
            return new Bean1(common());
        }
        @Bean
        Bean2 bean2(){
            return new Bean2(common());
        }
    }

    static class Bean1{
        private final Common common;

        Bean1(Common common){
            this.common = common;
        }
    }
    static class Bean2{
        private final Common common;

        Bean2(Common common){
            this.common = common;
        }
    }

    static class Common{
    }
}
Ex) 위 클래스 안에 다음 테스트 코드를 짠다.
- 실패
- 주솟값이 다르기 때문에 둘이 동일하지 않다.
<hide/>
@Test
void configuration(){
    MyConfig myConfig = new MyConfig();
    Bean1 bean1 = myConfig.bean1();
    Bean2 bean2 = myConfig.bean2();
    Assertions.assertThat(bean1.common).isSameAs(bean2.common);
}
- 성공
- 둘이 동일하다.
- 어떻게?
@Test
void configuration(){
    AnnotationConfigApplicationContext ac = new AnnotationConfigApplicationContext();
    ac.register(MyConfig.class);
    ac.refresh();
    Bean1 bean1 = ac.getBean(Bean1.class);
    Bean2 bean2 = ac.getBean(Bean2.class);
    Assertions.assertThat(bean1.common).isSameAs(bean2.common);
}
- 테스트 클래스 내부에 'MyConfigProxy' 라는 static 클래스를 만들어서 확장한다.
- 타겟 오브젝트에 대한 접근 방식을 제어하는 프록시를 만든다.
- 프록시는 확장해서 대체하는 방식으로 동작한다.
- 성공
- 확장한 프록시를 통해서. Common () 메서드가 생성하는 오브젝트가 딱 하나로 제한하고 이를 제한할 수 있는 캐싱하는 방식이다.
- 즉, 앞에서 봤던 속성 proixyBeanMethods = true 인 것은 스프링 컨테이너가 프록시 클래스를 생성하고 @Configuration이 붙은 빈 오브젝트로 사용하는 것이다.
- 스프링 컨테이너는 @Configuration이 붙은 클래스는 자동으로 프록시를 만들어서 기능을 확장해준다.
<hide/>
@Test
void proxyCommonMethod() {
    MyConfigProxy myConfigProxy = new MyConfigProxy();
    Bean1 bean1 = myConfigProxy.bean1();
    Bean2 bean2 = myConfigProxy.bean2();
    Assertions.assertThat(bean1.common).isSameAs(bean2.common);
}
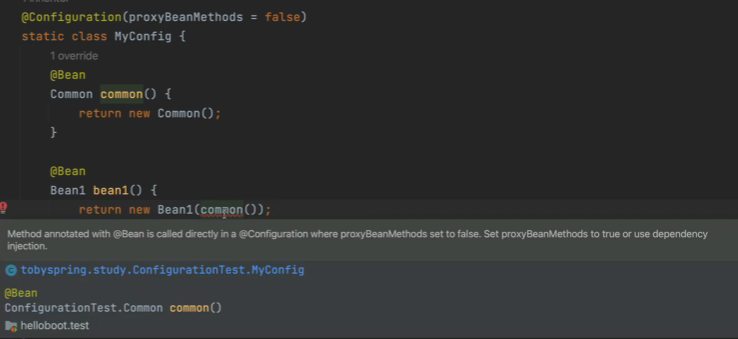
- 만약 false로 설정한다면?
- 다음과 같이 경고창이 뜬다.
- 경고: 프록시 빈 메서드가 false인 경우에 다른 빈 오브젝트를 직접 호출하는 방식을 사용하는 것은 위험하다.
- cf) SchedulingConfiguration 클래스에는 해당 설정이 false 로 되어 있다.
title
- content
- content
title
- content
- content
title
- content
- content
출처 - 인프런 토비의 스프링
'Spring Framework > 토비의 스프링' 카테고리의 다른 글
| Chapter 08. 외부 설정을 이용한 자동 구성 (0) | 2023.08.02 |
|---|---|
| Chapter 07. 조건부 자동 구성 (0) | 2023.07.24 |
| Chapter 05. DI와 테스트, 디자인 패턴 (0) | 2023.07.04 |
| Chapter 04. 독립 실행형 스프링 애플리케이션 (0) | 2023.06.24 |
| Chapter 03. 독립 실행형 서블릿 애플리케이션 (0) | 2023.06.20 |